The game-changing secret to cooking perfectly fluffy, golden-brown pancakes
Adam Liaw reveals how to make these treats with edge-to-edge colour, thanks to science.


Making perfectly thick, fluffy pancakes, all the same size with even edge-to-edge browning, is easier than you think. It starts with making the batter the night before.
Ingredients
450ml milk
2 eggs
300g (2 cups) self-raising flour
50g caster sugar
1 tsp baking powder
50g butter, to serve
maple syrup, to serve
300ml thickened cream, whipped, to serve
Method
Step 1
Add the milk, eggs, flour, sugar and baking powder (in that order) to a blender, and blend until smooth, scraping down the sides once or twice. Transfer the batter to a lidded storage container and refrigerate overnight.
Step 2
If you don’t have a blender, beat the eggs and whisk in the milk, then sift the flour and baking powder together and gradually add the flour mixture and sugar to the liquids, stirring gently with a whisk until incorporated, then pass the mixture through a sieve before refrigerating.
Step 3
When you’re ready to cook the pancakes, heat a non-stick frying pan over low-medium heat. For perfect, even colour, don’t add butter or oil to the pan (see notes). And if you want a faster pancake production line, heat 2 or 3 pans.
Step 4
Ladle in about 80g to 100g of batter and cook the pancake for 3 to 4 minutes, until it has risen and about half the surface is covered with bubbles. Flip and cook for another 2 to 3 minutes, until cooked through to the centre.
Step 5
Repeat with the remaining batter, keeping it in the fridge between batches so it stays thick and cold.
Step 6
Serve the warm pancakes with a pat of butter and maple syrup, with some whipped cream on the side.
Masterclass
Overnight batter
If you take only one tip away from this Masterclass, make it this: Preparing the pancake batter the night before is a game-changer.
Flour takes longer to fully hydrate than people think. It will form a batter as soon as liquid is added, but it can take up to four hours for the flour to absorb the liquid. This absorption gives you a thicker batter, essential for thick pancakes, because it won’t spread so far on the pan.

As your batter rests in the fridge, proteases (protein-digesting enzymes) in the flour will start to break down gluten and other proteins, increasing the extensibility of the batter. That’s the ability of the batter to stretch without breaking.
Sourdough bakers will be familiar with the process of autolysis – the technique of resting a dough after the flour and liquid have been combined. The “relaxation” of proteins in the dough increases its extensibility, allowing greater expansion of air and carbon dioxide in baking. The same process happens in your overnight pancake batter, resulting in thicker, fluffier pancakes.
Making the batter in a blender also helps because the cutting motion of the blender blades produces less gluten than mixing, and the blades can even cut long gluten strands formed in the mixing process. The result is less gluten in your batter, and again, fluffier pancakes.
Science aside, an overnight batter also means most of the work is done (and washed up) the night before. It’s nice to wake up on a weekend morning and have your pancakes ready to go.
Use consistent equipment for consistent results
A lot of home cooking is about working out how to reduce the number of variables.
For pancakes, you’re (hopefully) trying to make them all look the same. To do that, you need to be consistent. I prefer to make pancakes on my induction cooktop because I know the heat setting that will give me the right result. I use the same pan every time and measure my batter using the same ladle so that every pancake is the same size.
The first pancake
It’s accepted wisdom that the first pancake always fails. But it doesn’t have to.
First pancake fails are caused by two problems – the pan has not heated long enough to heat evenly, and/or too much oil has been added to the pan.
Food sticks to pans because molecules (usually proteins) within the food react to form chemical bonds with the metal of the pan. We usually prevent this by preheating the pan and adding oil to form a barrier between the metal and the food. However, this method is less effective for pancakes and certain egg recipes because they are cooked at lower temperatures than many other dishes.
Pancakes are cooked at about 120 degrees, while heating a pan to prevent food sticking when frying requires heating to above 200 degrees. As for the added oil, it’s absorbed by the pancakes or eggs, which also leads to uneven heat distribution.
The solution is to use a non-stick pan, and not to add oil.

Non-stick pans have a solid, low-adhesion polymer barrier between the metal and the food. Teflon pans use high-temperature plastic to form the barrier, while “ceramic” pans use a silica-based polymer. But a seasoned cast-iron pan will give the same results, with cooking oil creating the polymer. For lower-temperature cooking such as pancakes, it doesn’t much matter which of these you use.
By now, you might be asking what this has to do with pancakes. It’s all about how to cook them evenly.
Heat your pan at low-medium heat until it’s evenly heated. How long this takes will depend on the type of pan and the heat source you’re using. I heat a heavy non-stick pan for about five to eight minutes on my induction cooktop before making my first pancake. Induction works well for this because it allows you to heat a pan longer at lower heat so that the pan heat is even, but not overheated.
If you don’t have a non-stick pan, wipe a thin layer of oil on your pan using a paper towel. Anything more than that will give you the familiar oil pattern on the surface and around the edge of your pancakes, which is created by the batter absorbing oil and cooking faster in some spots than others. That’s not a problem, but if you want perfectly even edge-to-edge browning, don’t use any oil at all.
Continue this series
Saucy chicken thighs to perfect pies: The 20 most popular recipes of MarchUp next

Juicy roast chicken that’ll blow your mind: Three healthy air-fryer recipes from a nutritionist
Get this easy crisp-skinned chook, veg-loaded frittata and Asian-inspired chicken salad on your midweek meal roster thanks to the versatile air fryer.

How to make Australia’s most famous weekend brunch dish at home
Like the recipe’s creator, Bill Granger, these fluffy ricotta hotcakes, served with honeycomb butter and banana, are the stuff of Australian legend.
Previous

One magic marinade for chicken thighs, plus multiple great meals to make from them
Pan-roast a big batch of thighs, then serve it all week in different dishes (including the ultimate crisp-skinned chicken). Your future self will thank you.
The best recipes from Australia's leading chefs straight to your inbox.
Sign upMore:
From our partners
Similar Recipes


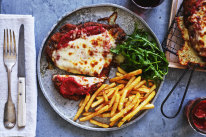
Adam Liaw’s step-by-step guide to making the perfect chicken parmigiana at home
- 30 mins - 1 hr
- Adam Liaw