
DIY: Removable timber shower base
WELL, the countdown is on. Our house plans are getting certified which means final approval is days away and we are really keen to make a start.
Chinchilla
Don't miss out on the headlines from Chinchilla. Followed categories will be added to My News.
WELL the countdown is on. Our house plans are getting certified which means final approval is days away and we are really keen to make a start.
I think a Christmas move-in is out, although maybe it can be done.
One thing we have learned is a well thought-out plan is the key to success.
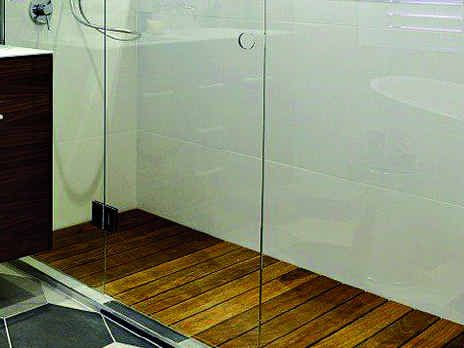
On bathroom and ensuite week on The Block we made a timber shower base. Not only did it look good but it also feels fantastic underfoot.
Living in Melbourne for nearly a year, we discovered how cold tiled shower floors are, especially at 2am, so the inclusion of a removable timber shower base seemed the logical answer.
We opted for tallowwood decking which is a species of eucalypt. Tallowwood is used to make boat decks due to its waterproof qualities. This is really one of the easiest things to make - talk about bang for your buck.
Step 1: THE SET-OUT
Measure your shower base length and width before drawing your shower base on a template or on your garage floor minus 20mm off the length and width so it will have a nice 10mm gap around the sides. Also there will be 10mm spacing between each length of timber. You can even draw all the timbers and aluminium u-channels to get an idea if you want them to run side to side or end to end and really get an accurate measurement of how many lengths you require. (Keep your template for later use).
Step 2: CUTTING
Cut all timbers to length using a circular saw or hand saw. This timber is extremly dense so go slow. Using a hack saw cut your aluminium u-channel the opposite way to the timbers; you will need one length every 400 for strength.
Step 3: PREP TIMBER
Now is the perfect time to oil your timber. You can use the aluminium lengths to sit the timbers on while doing this. Using a rag or a decking oil applicator apply the oil to the back face first, leave for 30 mins or as specified on the oil then turn them over and apply to the sides and face. Repeat this method twice.
Step 4: PUT IT TOGETHER
Place your timber on your template face-down using 10mm builders' packers as spacers between the timbers. Measure out your aluminium u-channel and using a drill and a 3mm bit, drill through the aluminium into the timber (do not go all the way through the timber, just 5mm). You can now start fixing your aluminium to the timbers using a drill and screws.
Step 5: FINISH
Drill a 25mm hole using a spade drill bit in one end so it can be used to lift your shower base out for cleaning. It is also a good idea to take the shower base outside and give it a good hosing and a bit of a scrub to get rid of any oil residue. Then pop it in and start your very own resort-style showering.
Ayden and Jess Hogan won The Block Triple Threat and Reno Rumble this year. Follow them as they build their dream home on Facebook: http://www.facebook.com/AydenAndJess
Tools:
- Tape measure
- pencil
- hacksaw
- handsaw or circular saw
- 3mm drill bit
- drill
- 25mm spade drill bit
- Phillips driver.
Materials:
- 90x19 tallowwood decking
- U-channel aluminium
- stainless steel dome head screws 8 x 5/8
- Accent exterior decking oil.
Originally published as DIY: Removable timber shower base

Pelicans in the outback: Incredible sights you need to head west to see
Western Queensland’s Channel Country has been transformed by unprecedented flooding, with tourists urged to witness the spectacle before it’s too late. SEE THE VIDEO

Award-winning health provider collapses
A highly respected Darling Downs health business will be liquidated after it was placed in administration.

Qld’s pub barons: Meet the people behind our favourite venues
From emerging stars to long-established millionaires and billionaires, a diverse group of people operate the best-known local watering holes in Queensland. SEE THE LIST

Named: Extradition warrant ordered after brutal knifing claims dad’s life
A man who was arrested interstate after a father was allegedly stabbed to death in NSW after a late-night street brawl has fronted a Toowoomba court.

Your chance to be in the Maroons’ sheds for Origin opener
With the Origin opener just nine days away, Queensland fans have the chance to get behind the Maroons by being in the Suncorp sheds – in name and spirit – and it’s all part of a multimillion-dollar plan to invest in people across State.

Abused kids exploited by failing $1.1bn child safety program
The most significant investigation into Queensland’s “broken” child safety system in generations has been called to look at how suicidal and abused children are being exploited by the industry.