
A coded dictionary. German testimony. For decades that’s all we had to understand the loss of a warship and its entire crew. But the discovery of HMAS Sydney’s wreck revealed the shot which sealed the ship’s terrible fate.
SEVENTY-four years ago today, Australia’s greatest naval tragedy unfolded off the coast of WA.
HSK Kormoran was a disguised German warship. Her job was to scour the seas for vulnerable cargo ships carrying the lifeblood of trade to the UK.
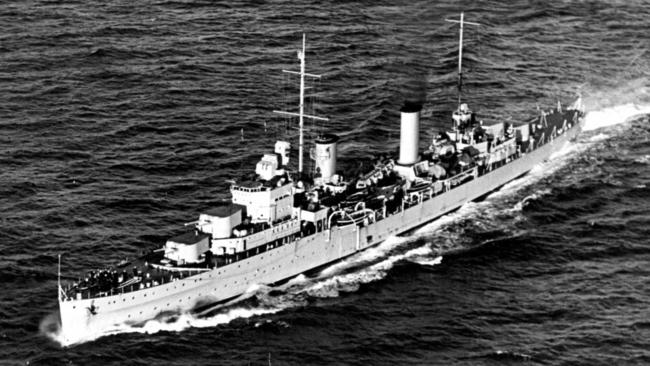
HMAS Sydney II was a light cruiser. Her job was to escort vulnerable ships, as well as to search the seas for hostile ships — like Kormoran.
The initial account of the battle that unfolded on the evening of November 19, 1941, was incomplete and confused. It was built up from interviews of German survivors — individuals who had only limited perspectives of what was going on.
But there also was suspicion: Australian interrogators were aware they had a one-sided story. Were there lies and distortions?
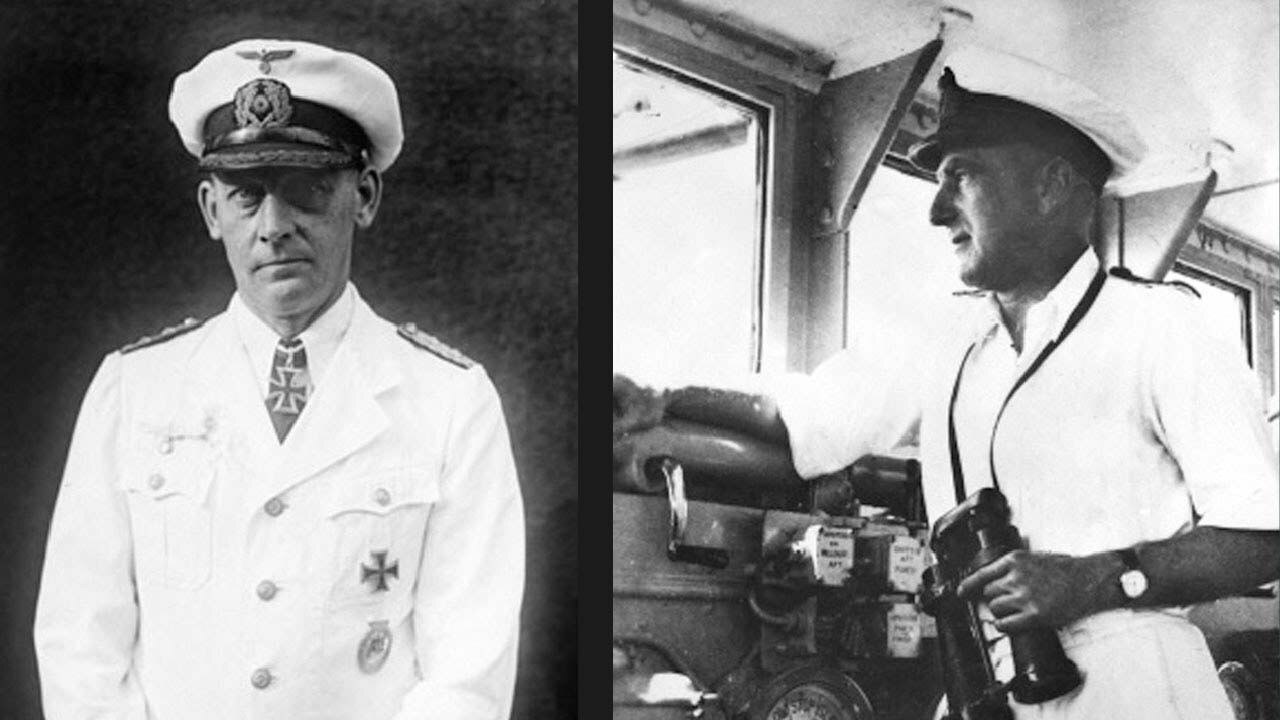
Eventually, in the 1990s, a German-English dictionary recovered from Fregattenkapitan (Commander) Theodor Detmers was examined and discovered to contain a cipher. It was a concise action report recorded for his superiors back in Germany.
Was this the definitive account?
For decades, these clues were all we had as to the fate of the 6000 tonne Australian cruiser and her 645 crew.
Why had its captain, Joseph Burnett, put his ship and crew in such a compromised position? How could a heavily armed German cargo ship sink the pride of the Australian navy?
Now, after the wreck was discovered in 2008 and a second expedition — launched by the WA Museum and Curtin University — closely examined the wreck in April this year, we’re getting a much clearer picture of HMAS Sydney’s agonised final hours.
THE SCENE IS SET
HMAS Sydney was a battle-tested veteran.
Many of her officers and crew had experienced the opening battles in a new kind of war. They had endured the startling intensity of air attack. They had even won renown by chasing down two — and destroying one — of Italy’s most modern cruisers.
So, in the waning hours of November 19, 1941, there was more to HMAS Sydney’s advantage than just her big guns and armour.
But Captain Detmers of Kormoran had an ace up his sleeve.
Uncertainty.
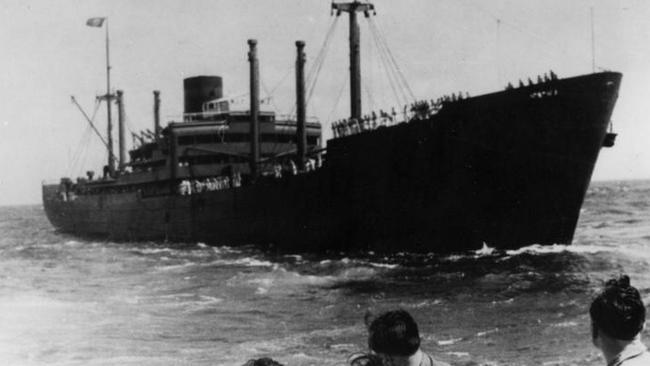
His was a ship of many faces. Prefabricated panels and canvas strips could make the heavily armed Kormoran look like any number of friendly, harmless merchant vessels.
And the doubts in Captain Burnett’s mind may have been unexpectedly heightened.
As Wesley Olson highlights in his 2000 book Bitter Victory, he’d recently received an urgent message from the Royal Navy’s Admiralty.
Britain was losing far too many cargo ships. Every opportunity must be taken to seize those of the enemy to help fill the gaps in the lifelines keeping its besieged population fed.
The implications of this order were profound, but poorly understood.
It meant patrolling warships, such as HMAS Sydney, would have to take greater risks when assessing unidentified vessels. Was it a German raider? A valuable German cargo ship trying to slip the net? Or just an innocent merchantman fumbling its communications?
To resolve this quickly, patrol cruisers would have to get closer. Even closer again if they were to launch boarding parties fast enough to prevent German cargo ships sinking themselves.
But the closer a cruiser like HMAS Sydney came to a disguised raider like Kormoran, the less protection its armour and long-range guns offered.
This was the life-and-death “Captain’s call” Burnett had to make.
TRUE COLOURS
From German accounts, HMAS Sydney appears to have been suspicious to the last.
Captain Burnett had kept the four turrets holding Sydney’s eight big 6-inch guns pointed firmly at Kormoran’s side during the long and drawn-out identification process.
The cruiser appears to have closed the range slowly, signalling with lamps and flags: “What are your signal letters”.
Commander Detmers deliberately delayed.
The game of cat-and-mouse which followed has been exhaustively analysed. But it remains full of uncertainty.
Detmers wanted to deceive Burnett. He did not want to fight.
Basically, he desperately wanted the deadly Australian warship to go away.
If forced to fight, however, Detmers knew it needed to be on the most favourable terms possible.
As HMAS Sydney nosed ever closer, the raider’s disguise as the Dutch cargo ship Straat Malakka grew thinner.
Sydney, now barely 1.5km from the German ship’s concealed guns and torpedoes, was vulnerable.
What was Captain Burnett thinking?
“The ensign had hardly broken before the first shot fell from the first gun,” one of Kormoran’s crew later wrote.
The time was 6.30pm.

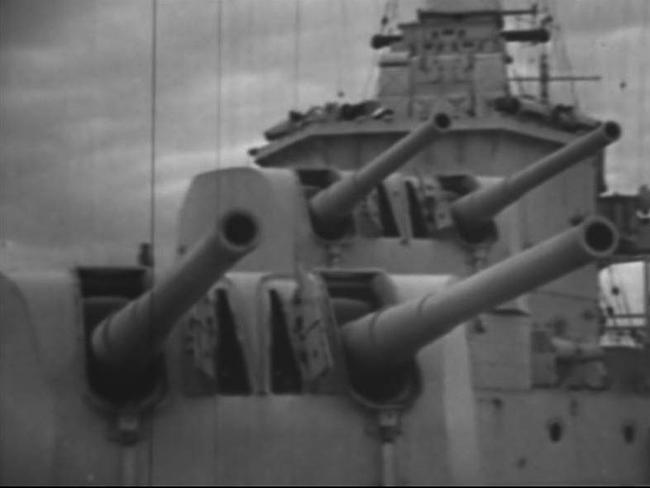
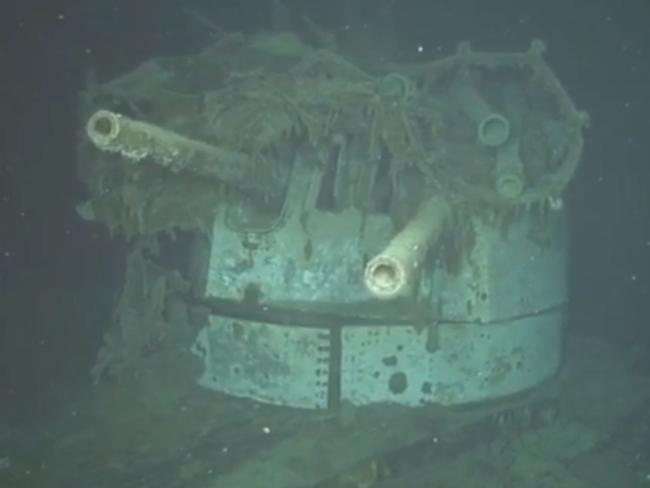
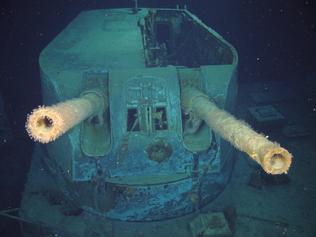
One of HSK Kormoran’s concealed 15cm cannon. This one had been named ‘Linda’ by its crew. Picture: WA Museum and Curtin University. Copyright WA Museum.
FIRST SHOTS
The German raider was ready. Was HMAS Sydney?
Either way, the Australian cruiser was on the back foot. She was simply too close.
Kormoran’s gun crews could aim at specific parts of the Australian warship. The engines. The guns. The director control tower.
The precise sequence of the following battle is uncertain. Many attempts have been made to patch together scenarios that best fits the multitude of accounts from Kormoran’s crew.
The most comprehensive, compiled by the HMAS Sydney II Commission of Inquiry in 2009, melded testimony with the initial study of HMAS Sydney’s wreck.
The latest WA Museum and Curtin University expedition adds hundreds of thousands of high resolution pictures and hundreds of hours of HD footage to the mix — providing a new chance to discover and verify more details. Super computer time has been booked to turn these into a high-resolution, interactive 3D model of the site.
But they will only ever tell us what happened. Not why.
Kormoran’s fake panels suddenly fell away, exposing the black muzzles of her six 15cm cannon and seven smaller automatic guns.
In the haste that followed, only one of the four guns able to fire at Sydney appears to have been ready when the order to shoot came
This shot was aimed at HMAS Sydney’s bridge — the point at which Australia’s Captain Burnett stood.
But the Germans said the shell fell short.
Mere moments later a second German big gun opened fire: Its shell also went wide — probably passing over the Australian warship.
Immediately, HMAS Sydney replied.
The fingers of HMAS Sydney’s gunners had been on their triggers.
All of the cruiser’s eight 6-inch guns — distributed between “A” and “B” turrets in the bows and “X” and “Y” turrets on the stern — belched flame. These were aimed at Kormoran’s bridge.
Several may have passed through the German’s thin structure without exploding.
As the boom of big gun rang out, so too did the chatter of Kormoran’s smaller, rapid-fire 37mm and 20mm anti-aircraft cannons.
Sydney was so close these could be used against her crew.
Amid the cacophony, two torpedoes were ejected from Kormoran’s deck launchers. These began their race towards Sydney.
It took just a few more seconds for the raider’s two big guns to reload and one of the remaining pair to clear itself for fire.
The second salvo was more disciplined, more complete.
All three shots were again aimed at HMAS Sydney’s command centre.
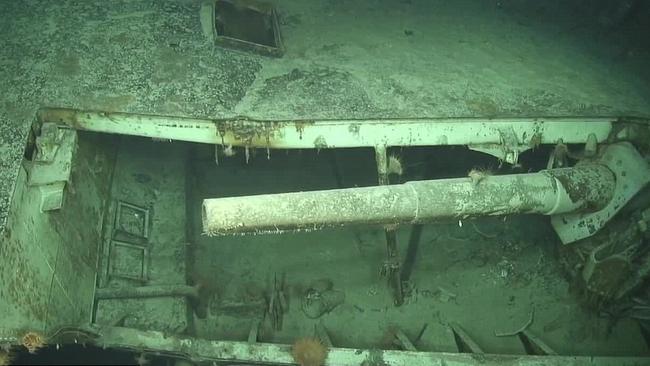
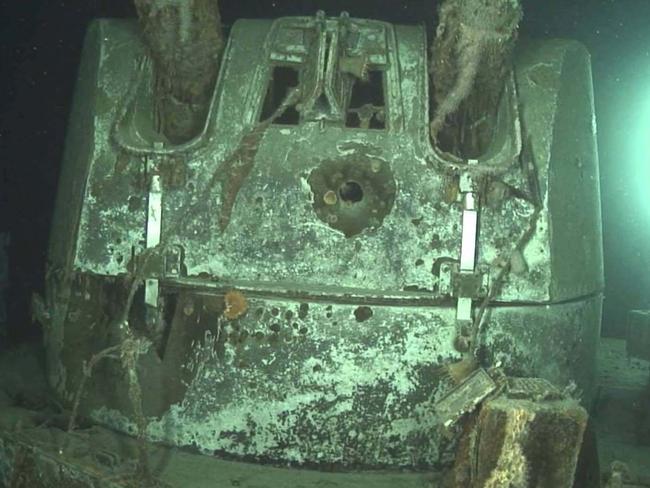
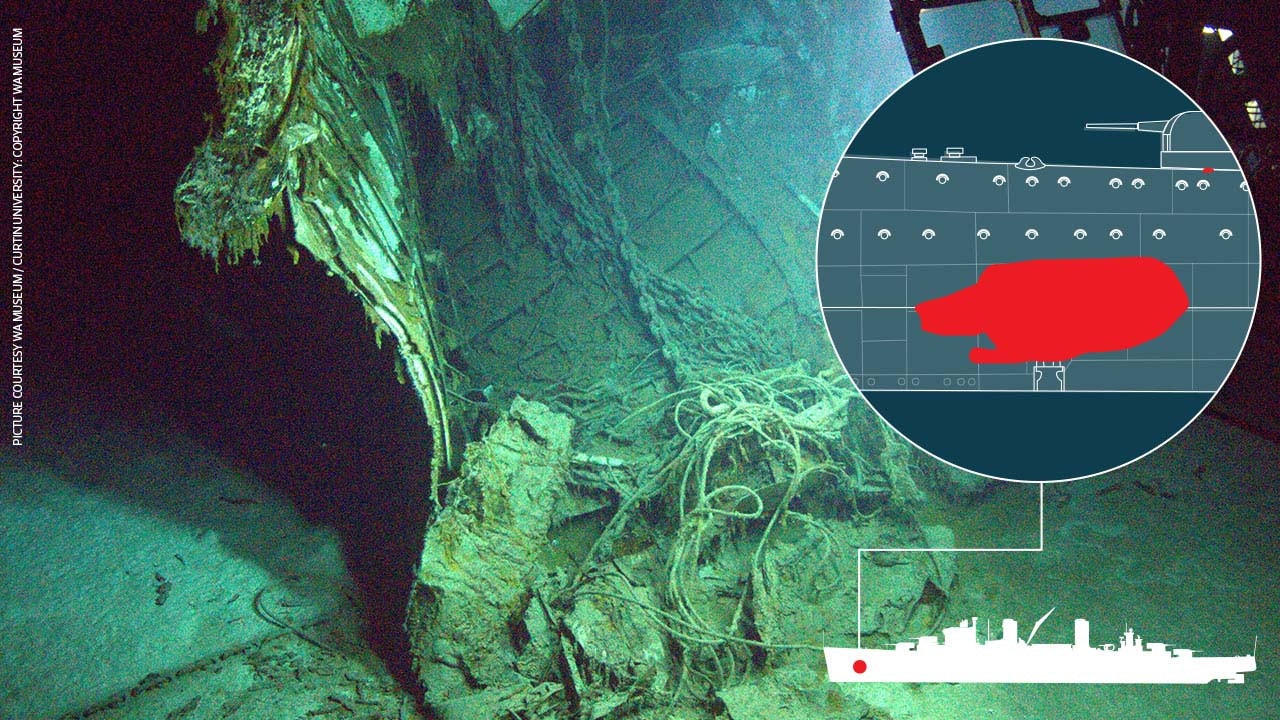
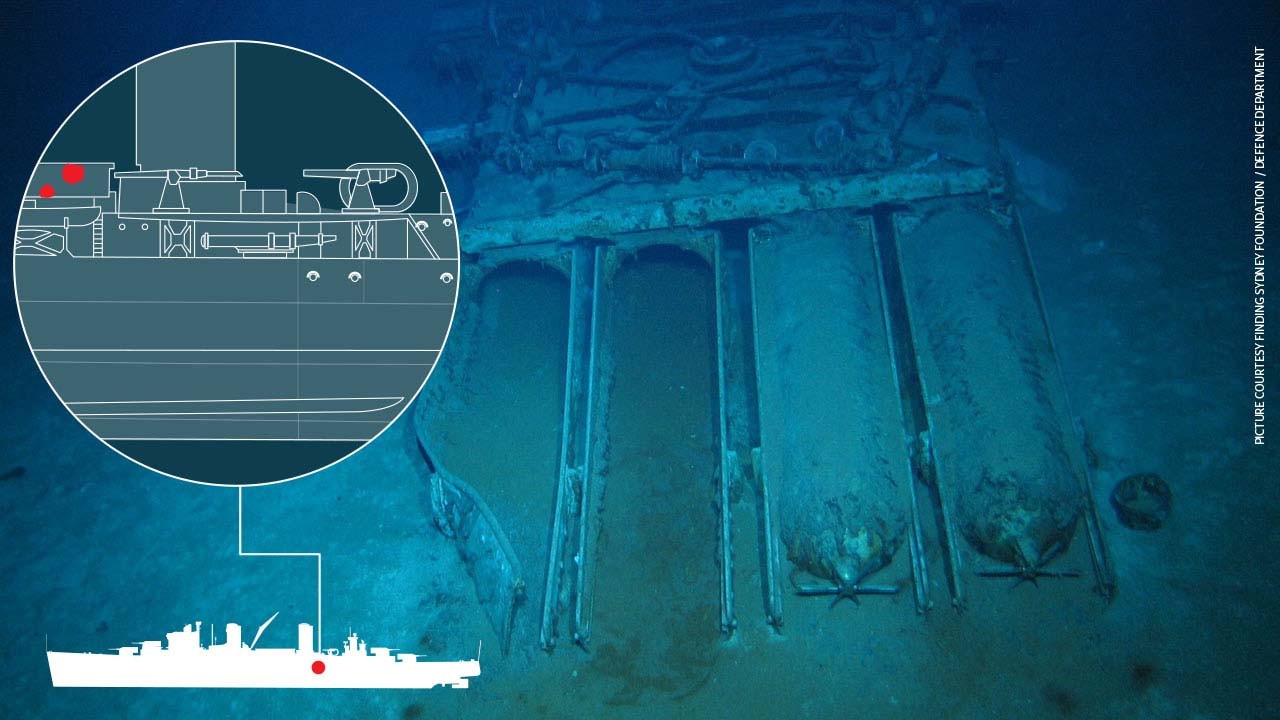
The shell hole in the base of HMAS Sydney’s Director Control Tower.
BULLSEYE
Kormoran’s survivors say the effect was immediate and dramatic.
HMAS Sydney’s command spaces erupted in flames.
The shells tore through the superstructure forward of the mast.
There is little doubt Captain Burnett, and many of his key personnel, were killed or maimed in this conflagration of steel and flame.
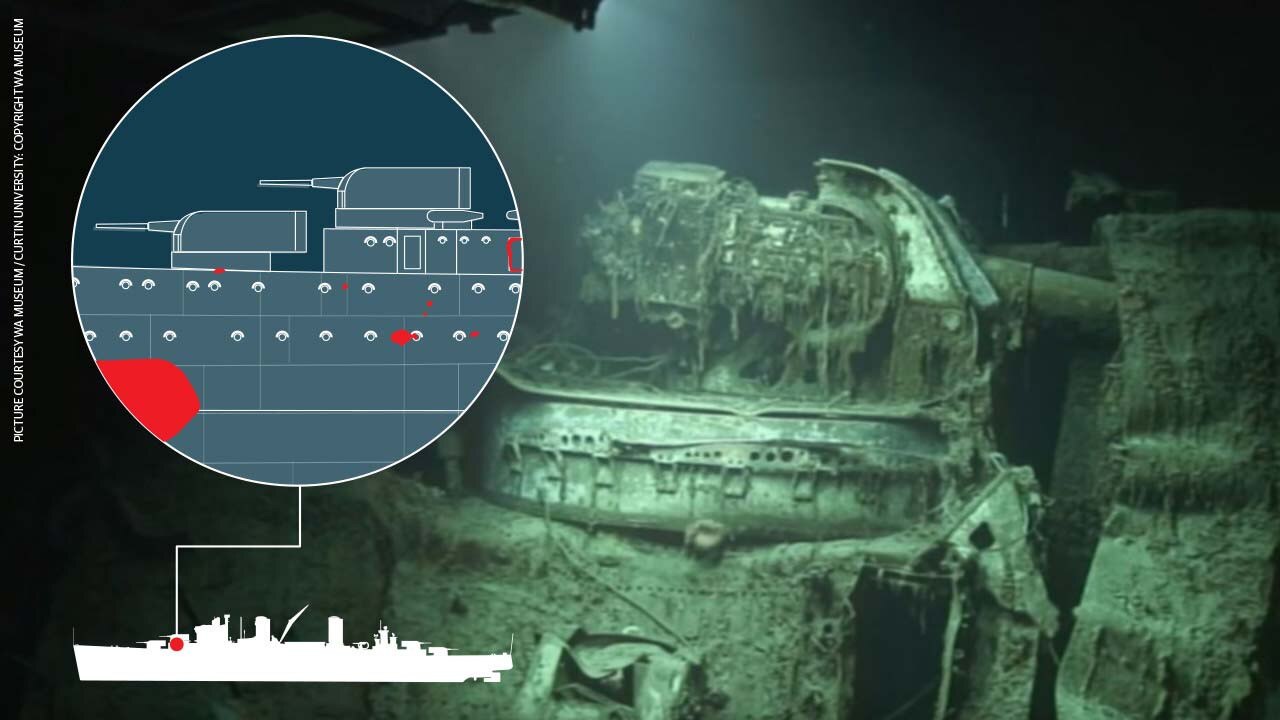
Photos of the wreck taken in April this year for the first time support this. They revealed a previously unseen 15cm shell hole in the plating of the compass platform — a room directly beneath the exposed deck where the Captain, Navigator and key personnel stood.
HMAS Sydney had lost its captain mere seconds into the battle.
Valuable time would be lost before the First Lieutenant would realise this and take command from his back-up position deep below the waterline of the ship.
By all accounts, HMAS Sydney was already crippled.
Sitting atop the forward superstructure, above and behind the bridge, was the Director Control Tower. This was an armoured pod containing the optical sights which controlled the cruiser’s guns. It was also her main advantage over the German ship.
The heavy director should have been immune from Kormoran’s smaller guns. But not the big ones.
Kormoran’s crew were good shots.
Survivor accounts state that HMAS Sydney lost control of her armament after only the first salvo.
Now we know why. Pictures of the wreck show another big 15cm shell had burst under the base of the Director Control Tower, immobilising it and killing or injuring its crew.
The impact of Kormoran’s smaller automatic cannon in these opening moments cannot be underestimated. Each firing 80 to 120 rounds a minute, their shells also would have been exploding across HMAS Sydney’s control positions.
HMAS Sydney — shocked, shattered and burning after Kormoran’s sudden onslaught — appears to have begun to slow. Had Burnett had time to order his ship to try and avoid the onrushing torpedoes?
By now nobody was likely left alive in a position to see their approach.
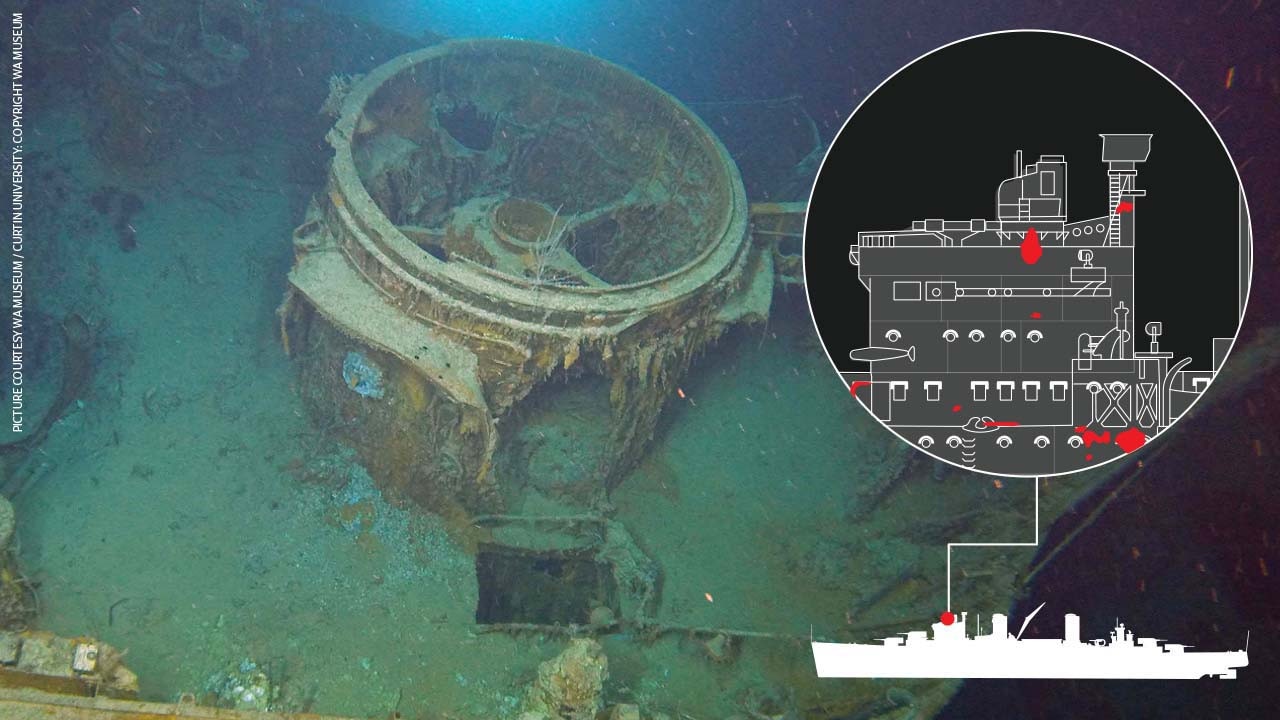
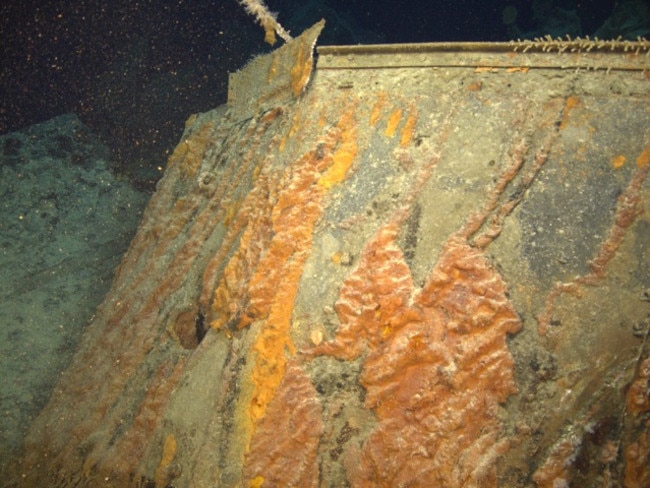
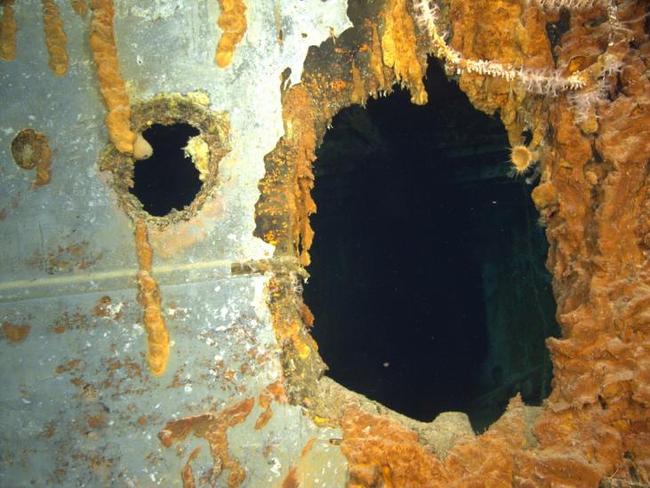
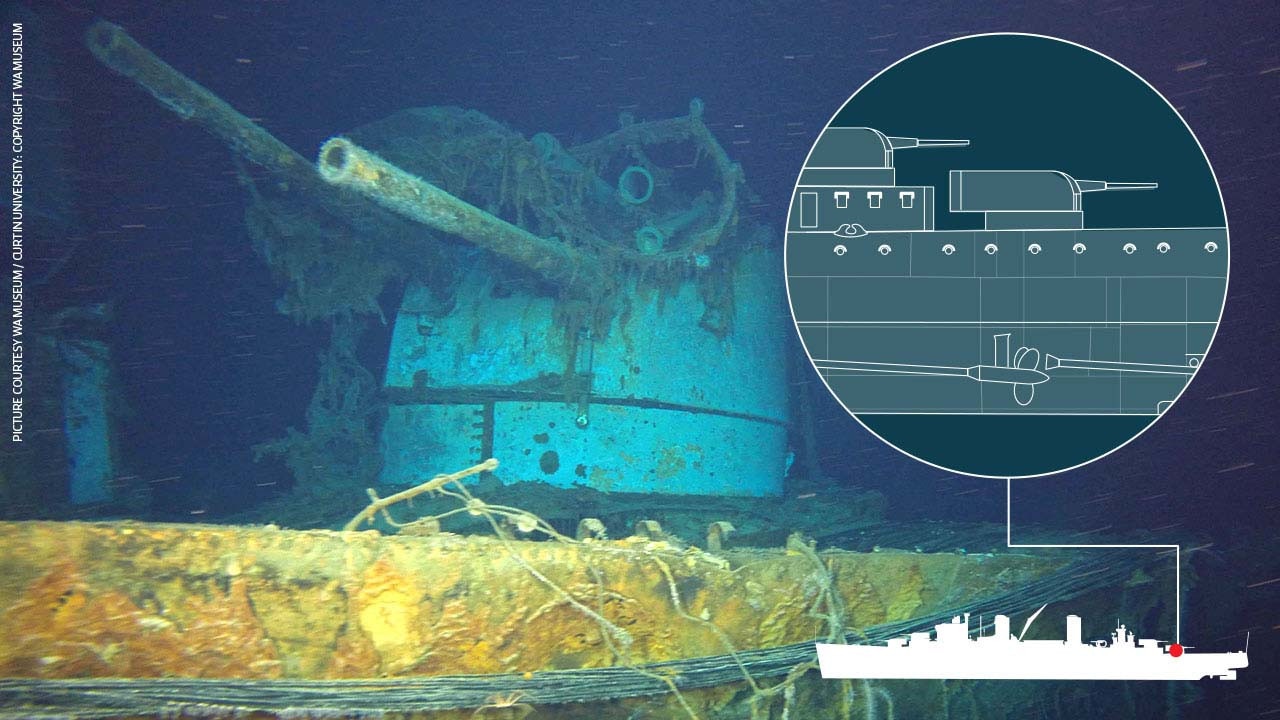
The collapsed bow of HMAS Sydney, showing the wreck of “A” turret.
DISARMING ASSAULT
By Kormoran’s third salvo — less than one minute into the battle — her gunners had shifted target.
Now all four available big guns were probably ready. These zeroed in on HMAS Sydney’s two forward twin 6-inch gun turrets.
If these could be disabled, Kormoran would greatly reduce the punishment she was by now suffering herself.
At such short range, the German gunners were again accurate. Survivor accounts tell how both turrets immediately fell silent.
Pictures from the sea floor reveal why. Both sustained direct, accurate hits. Each turret contained 20 men. None are likely to have survived.
Again, the close-range anti-aircraft guns were having a dramatic effect.
Their explosive shells had been redirected away from the wrecked control tower, raking the crews of HMAS Sydney’s exposed port (left) side secondary armament of 4in guns. Then there were the crews of the torpedo tubes and anti-aircraft guns standing — in the open — on the Australian warship’s decks.
Many would have been cut-down or forced away from their weapons.
Photos of HMAS Sydney’s wreck show two of the four torpedoes in the port-side mounting as missing. Had they been hurriedly fired amid the hail of lead and steel? If so, they went wide.
HMAS Sydney’s catapult, set alight when a shell set destroyed the cruiser’s float plane.
BODY BLOW
With Sydney’s superstructure and forward gun turrets now a mass of smoking tangled steel, Kormoran’s gunners were ordered to aim at the waterline. That is where the most devastating damage could be inflicted.
Many of Kormoran’s salvos seem to have been aimed at Sydney’s engine spaces between the two funnels. Above this was the catapult where the Walrus float plane was sitting in preparation for launch. One shell went high, ripping through the fragile aircraft and setting its volatile fuel aflame.
Other German shells were defeated by Sydney’s protective armour belt. But many others seem to have penetrated deep into the cruiser, wrecking equipment and setting new fires.
Kormoran’s barrage was relentless, systematically working its way along the Australian ship.
Salvo after salvo pummelled the cruiser.
One German gunner stated in an interview after his rescue that he had counted 30 to 40 hits on the Australian cruiser. The 2008 wreck survey counted 41 15cm shell hits on the port (left) side alone.
But Sydney’s stern guns — “X” and “Y” turrets — remained operational. Initially immobilised by the loss of the Director Control Tower, their crews began firing on their own initiative.
These shells bit deep into Kormoran.
One 6-inch shell tore trough the German raider’s smokestack. A second burst alongside an auxiliary boiler room — tearing a pipe and sending a jet of blazing oil into the engine room below.
Kormoran was doomed. Her firefighting equipment had also been destroyed. The flames would gradually grow out of control. Her crew feared what would happen if the flames reached the 300 highly explosive mines stashed inside her hull.
But HMAS Sydney was reeling like a stunned boxer. She was said to be enveloped in flames. Photos of burnt deck timbers and scorched paintwork support this.
As another salvo of German 15cm shells crashed into the cruiser, so too did a German torpedo.
The time was just 6.33pm.
The compressed and torn edge of HMAS Sydney’s collapsed bow.
KILLER PUNCH
It had been just three minutes after the first shots had been fired.
But now HMAS Sydney’s fate would be sealed.
A torpedo detonated on the cruiser’s bow, immediately in front of “A” turret.
German accounts state the Australian cruiser vanished behind a huge cloud of spray and black smoke. As HMAS Sydney moved clear of the cloud, her bow was seen to be low in the water.
Torpedos were Captain Detmers’ only real chance of sinking Sydney quickly. At such close range, the volatile ammunition magazines buried deep within the cruiser’s hull were out of reach of cannon shells. Nor would guns alone likely damage enough water tight compartments to flood her fast.
However, World War II torpedoes were incredibly clumsy devices. Even 1.5km was an extreme range from which to fire and expect a result.
Again, the skill of Kormoran’s crew shone through.
But the critical nature of this torpedo blow was not immediately apparent.
HMAS Sydney’s battered bow remained in place — the buckled structural steel beams screaming under the weight of inrushing water and the lurch of the great ship through the rising waves.
The burning Sydney had by now altered course, stumbling back towards Kormoran as if to ram.
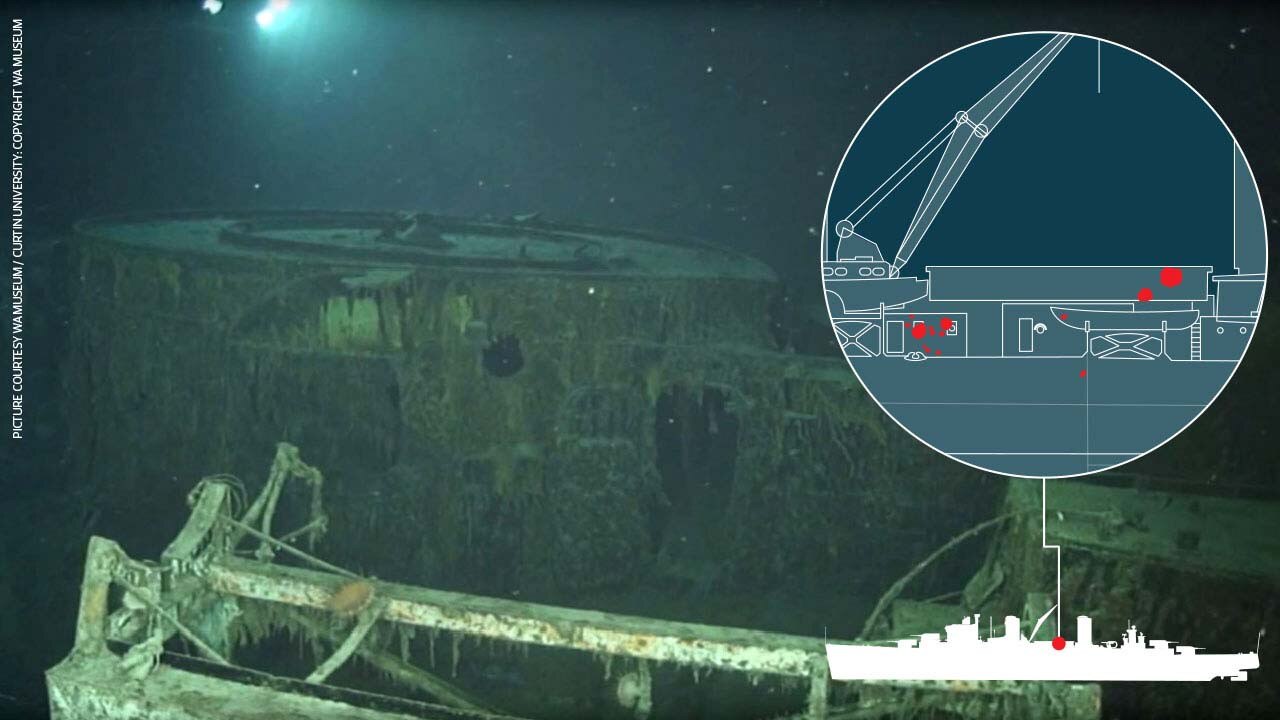
Wreckage from the sinking is snared atop HMAS Sydney’s “Y” turret.
FIGHT OR FLIGHT
As the big ship came around, another German salvo crashed into her. One shell exploded on “B” 6-inch turret. German survivors told of how its armoured roof was blasted high into the air before toppling overboard.
Photos from the sea floor confirm this.
HMAS Sydney did not ram Kormoran.
Instead, she slipped behind and began to make her way steadily east.
By passing astern the raider, Sydney had temporarily placed herself in the ‘blind spot’ of most of the German’s big guns.
The time was just 6.35pm.
For a time there was an eerie lull in the battle.
HMAS Sydney was struggling to bring her own surviving guns around to aim at the German. But, for some reason, “X” and “Y” turrets remained facing the wrong way.
“X” turret, which had so competently put up a rapid-fire response in the opening minutes, had been hit by a 15cm shell at some point after the turn. “Y” turret, which had also let fly several rounds, appears undamaged.
Studies suggest both guns may have lost electrical power, reducing their ability to turn — especially if their crews had been reduced through casualties or firefighting efforts.
Kormoran, slowing after her blazing engine room had been abandoned, was deliberately facing away from the Australian ship to present as small a target as possible for any incoming torpedoes.
Some of the German survivors say they saw HMAS Sydney fire four. All missed.
Gradually HMAS Sydney drew away. Soon Kormoran was outside torpedo range.
Detmers made a decision: He would turn “to port in order to destroy (the) enemy completely”.
He ordered his ship — now crippled by the spreading fire — to use the last of its motive power to come about, once again allowing its big guns to line up the enemy.
The time was 6.50pm.
Two torpedos are missing from HMAS Sydney’s port (left) torpedo tubes.
END GAME
Exactly how many shots were fired by Kormoran in this last phase of the fight is not certain. But there is extensive damage on the starboard (right) side of HMAS Sydney.
The pummelling continued. Kormoran sent shell after shell into the slowly receding wreck.
The 2008 wreck survey has revealed 46 15cm shell hits.
But the survey of the cruiser’s wreckage also revealed HMAS Sydney’s the starboard torpedo mount could not have fired. Photos from the sea floor show it still holds its deadly weapons. And the cruiser did not carry spares.
Some German accounts state HMAS Sydney continued to reply. But the shots — perhaps from the starboard 4in guns which had been shielded from the initial surprise attack — were reportedly erratic.
Kormoran’s own accuracy must also have rapidly diminished.
At 7.25pm, Captain Detmers ordered his weary gun crews to cease fire. Sydney was now out of range.
She was in no condition to continue the fight. Her surviving crew knew this.
By now HMAS Sydney was limping towards the darkened horizon — and the safety of Australia’s shores beyond.
Accounts by German survivors describe a flickering glow on the dark horizon. This vanished at some point about 11pm.
She was not seen again.
Until 2008.

FINAL MOMENTS
HSK Kormoran sank at 1.35am. Over the following days, her surviving crew was plucked from the water and West Australian coastline by incredulous Australian military and civilian ships.
What had happened HMAS Sydney? Where was her crew?
They were questions that would linger for almost 67 years.
Did the fires reach the stores of volatile ammunition contained in magazines deep under the main guns? Or did her reserve torpedoes detonate in the raging fires? Had Kormoran punched enough holes in Sydney’s side for her to capsize and sink?
Now the extensive photo and video survey by WA Museum and Curtin University of HMAS Sydney’s wreck has painted a clearer picture of battered cruisers’ final moments.
Flames engulfed most of her upper decks, and were probably spreading below. But worse than this was the way the hull had been peppered with shell and splinter holes.
The Commission of Inquiry found as many as 455 of her 645-strong crew would most likely have been dead or incapacitated by this time.
The 200 or so survivors would have been struggling to maintain control of the ship, contain fires and stem flooding in an environment full of heat and thick smoke
But they had no control over what was happening to the cruiser’s weakened bow.
The torpedo blow several hours earlier was taking its terrible toll.
The weather was getting worse. Sydney would have been wallowing in the rising waves, low and heavy due to the water in her bowels.
More and more was flooding in with every wave — through numerous shell holes and tears in the hull.
The end, when it came, was probably very quick.
Tortured steel beams gave way.
The entire bow probably did not collapse. Though it did get torn away as the ship rushed through the water towards the bottom.
Instead, it was likely a damaged structural bulkhead — a heavy watertight wall — behind it which collapsed.
This opened HMAS Sydney’s vitals to the onrushing ocean.

What little remained of HMAS Sydney on the surface would have rapidly been dispersed by wind, wave and ocean currents.
The battle was a bitter victory for both parties.
Kormoran, against the odds, had caused the sinking of a much more powerful Australian cruiser.
HMAS Sydney, at immense cost, had put an end to a severe threat to Britain and Australia’s vital supply lifelines.
But the loss of 645 officers and crew would remain a deep scar on Australia’s psyche for decades.
Now, with the discovery of the wrecks of HSK Kormoran and HMAS Sydney, the ghosts of November 19, 1941, are finally being put to rest.
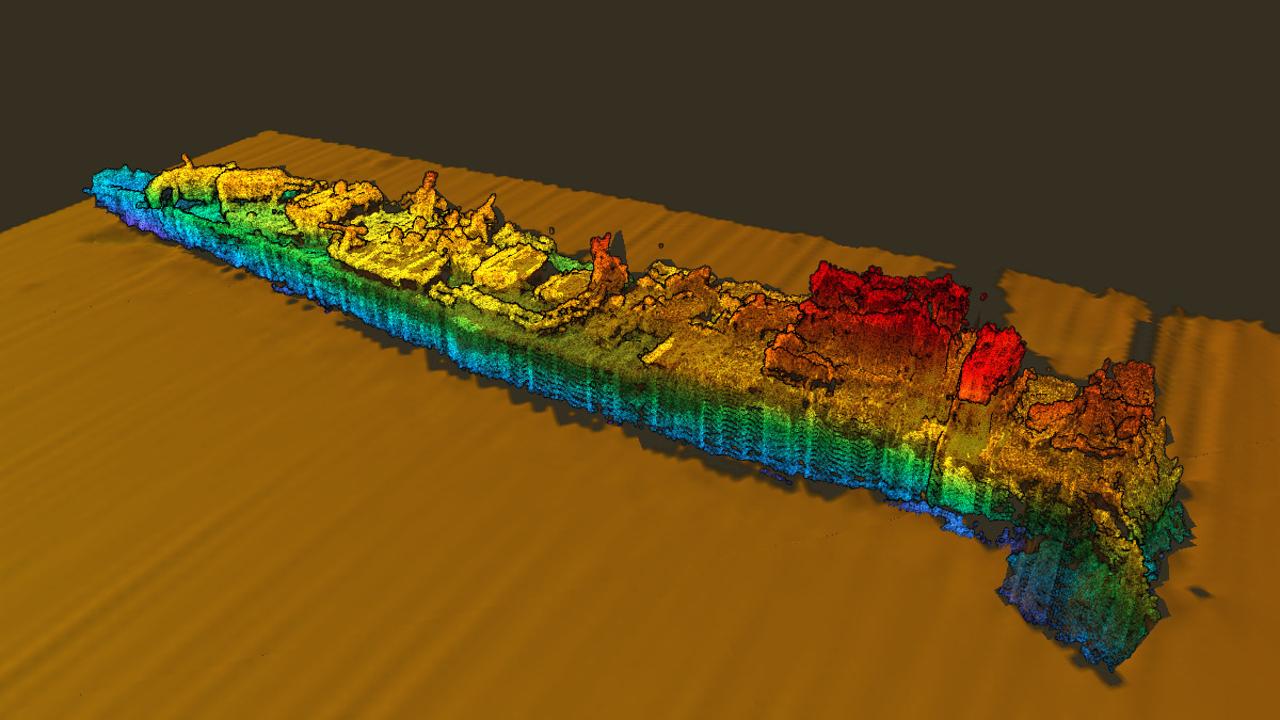
A multi-beam sonar image of HMAS Sydney II’s wreck. Picture: WA Museum and Curtin University (Andy Bickers). Copyright: WA Museum.
Diagrams based on battle-damage drawings from the Defese Science and Technology Group. Wreck photos courtesy WA Museum / Curtin University. Historic pictures News Corp Archives / Australian War Museum. Title picture courtesy Defence Science and Technology Group. Story: @JamieSeidel
Add your comment to this story
To join the conversation, please log in. Don't have an account? Register
Join the conversation, you are commenting as Logout
Thousands of Aussies want inquest into Louisa Ioannidis’ death
Calls for an inquest into the death of 24-year-old Louisa Ioannidis, who was found dead in a Melbourne creek, have grown after new evidence was discovered.
‘Silenced and sidelined’: Broken justice system fails victims of crime
Victims of violent crimes and sexual assault say going through Victoria’s “injustice” system was worse than the crime itself, with some questioning whether they would ever report another crime.