Fromelles: night of disaster
Thousands of young Australians paid with their lives in the battle, victims of extraordinary military incompetence.
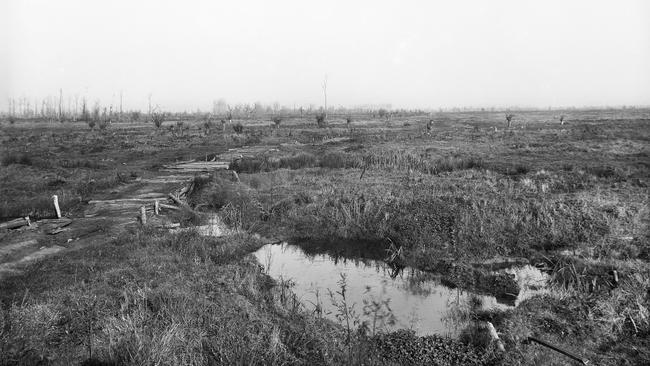
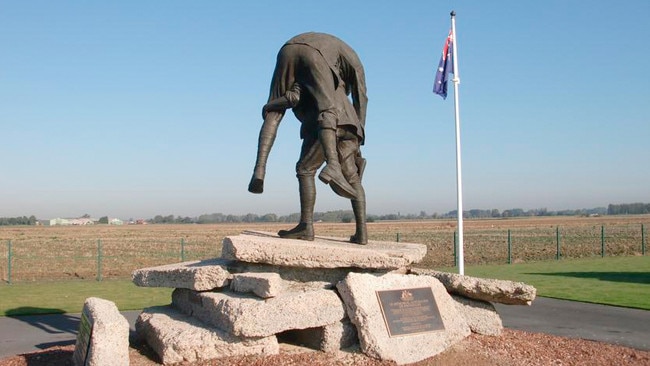
VC CORNER CEMETERY is a sad and desolate place. Set amid the flat, featureless farm plains of French Flanders, the tiny cemetery has the forlorn feel of a lost island in a silent sea. For almost 100 years few travellers have stopped there. Yet VC Corner Cemetery holds a special place in Australia’s past. It is the only solely Australian war cemetery in France.
It is also the only cemetery without headstones. There are no epitaphs to individual soldiers, simply a stone wall inscribed with the names of the 1299 Australians who died in battle nearby and who have no known graves. The unidentified remains of 410 of them are buried in mass graves under two grass plots.
The cemetery rests in the middle of the former no-man’s-land on the site of the Australians’ bloody initiation on the Western Front – an event later formally titled “the battle of Fromelles”, but cynically dismissed by surviving soldiers as “that Fleurbaix stunt”.
The British high command devised the attack as a feint to hold German reserves from moving south to the Somme, where the large allied offensive had begun on July 1. In the event, it had no effect on the Somme battles. More than 5500 Australians became casualties in the single night of July 19-20. Almost 2000 of them were killed in action or died of wounds and 470 were captured. This was perhaps the greatest loss by a single division in 24 hours during the entire war. Many consider Fromelles the most tragic event in Australia’s history.
To the soldiers, the battle of Fromelles was an unmitigated military disaster, the dismal culmination of muddled planning and reckless decision-making by both British and Australian commanders and staff.
READ MORE: The Great War, Part Two: The Western Front
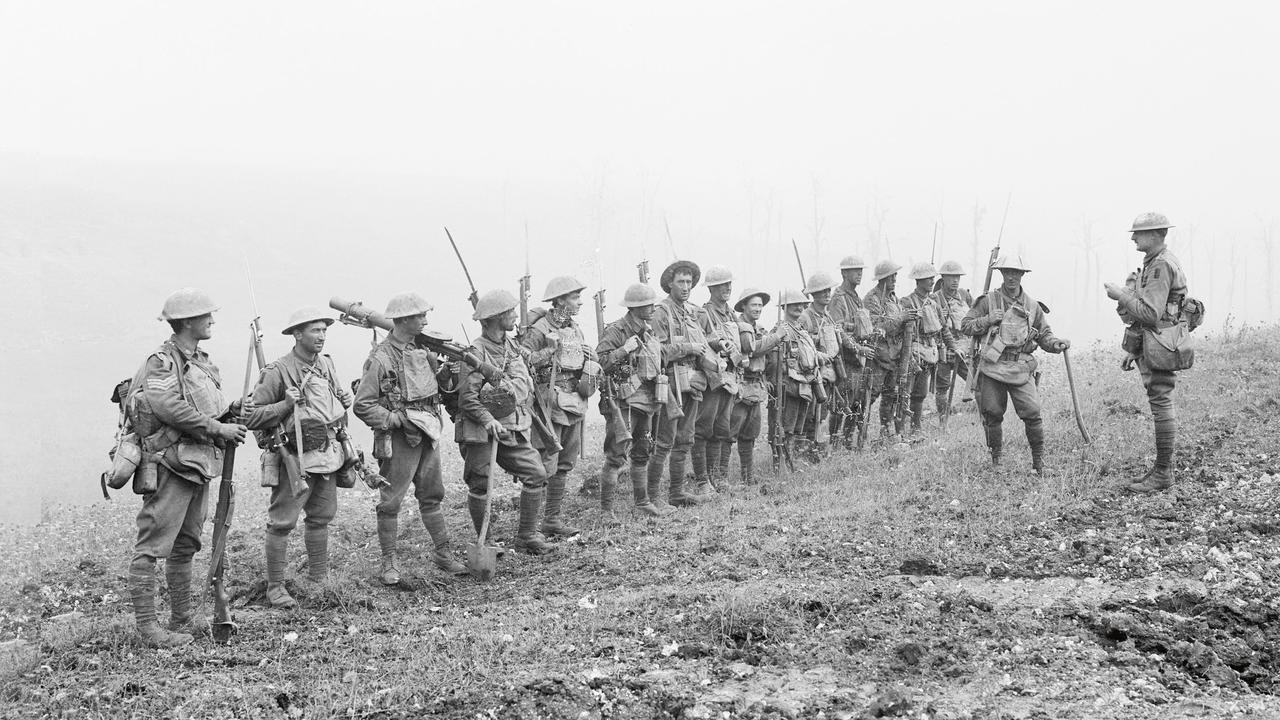
In the late afternoon of July 19, 1916, soldiers of the 5th Australian Division, together with the British 61st Division, were sent to attack the heavily fortified German front line in front of the Aubers Ridge. The infamous ridge in the German rear area, although only 40 metres high, was the highest feature on the landscape, giving the Germans a commanding view of the Australian and British preparations.
The 12 battalions of the raw and untried 5th Division had just arrived in France and the Australian soldiers were undergoing acclimatisation in the trenches of the “nursery sector” near Armentieres to gain experience and participate in trench raids in the area. Within weeks they were thrown into battle.
The attack began to go wrong even before the men went over the top. The ill-prepared Australian troops were packed into their front-line trenches, shoulder to shoulder, prior to the attack and suffered casualties from German artillery fire and from ‘drop shorts’ fired by their own inexperienced artillery. Two British battalions also suffered heavily, losing 140 men to artillery fire before they left their trenches.
Along the 4km front of their attack, the Australians had to cross between 80 and 400 metres of open ground in broad daylight and under direct observation from the German lines. The German defences included concrete blockhouses and a strong redoubt, known as the Sugarloaf, overlooking most of the allied line of advance.
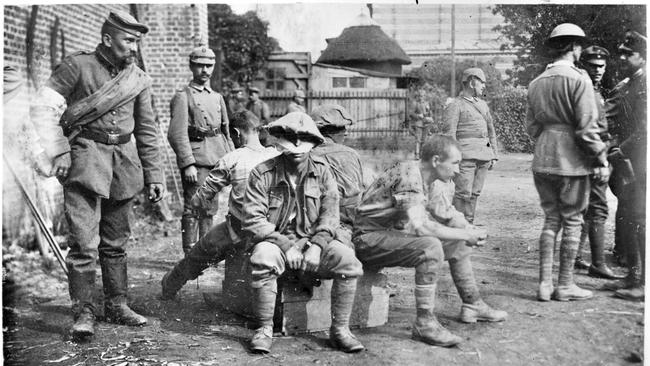
After a seven-hour bombardment, the Australians attacked at 6pm; there were still two and a half hours of summer daylight left. Soldiers went over the top, heavily laden with scaling ladders, picks, shovels and bags of grenades. Almost immediately they came under heavy machine-gun fire. Sergeant “Jimmy” Downing of the 57th Battalion recalled: “Hundreds were mown down in the flicker of an eyelid, like great rows of teeth knocked from a comb … men were cut in two by streams of bullets … It was all over in five minutes.”
The allied artillery preparation had been wholly inadequate. It had failed to neutralise the German batteries directed from the Aubers Ridge and it failed to destroy the German machine-gun posts. The Germans continued to pour heavy fire onto the Australians from the flanks and especially from the Sugarloaf.
The 15th (Victorian) Brigade was destroyed within 15 minutes, entire companies of infantry being virtually annihilated. Their commander, Brigadier General Harold “Pompey” Elliott, who had earlier expressed misgivings about the attack, was speechless with grief the following day, “the tears streaming down his face, as he shook hands with the returning survivors”.
Official war correspondent Charles Bean recorded after meeting Elliott: “I felt almost as if I were in the presence of a man who had just lost his wife.” One of Elliott’s battalions, the 60th, had gone into the attack with 887 officers and men. When the survivors gathered at brigade headquarters the following afternoon, only one officer and 106 men answered the roll call.
The 14th (NSW) Brigade and the 8th Brigade (comprising battalions from Victoria, NSW, South Australia, Queensland and Western Australia) succeeded in capturing some 1000 metres of the German second line. But they were unable to locate their final objective, a supposed third German trench line. This was later found to be merely the remains of abandoned trenches.
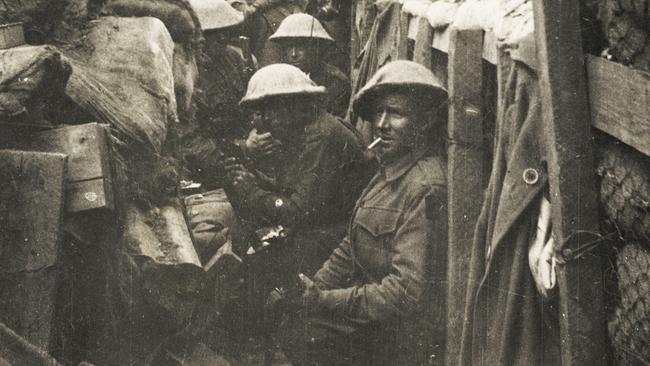
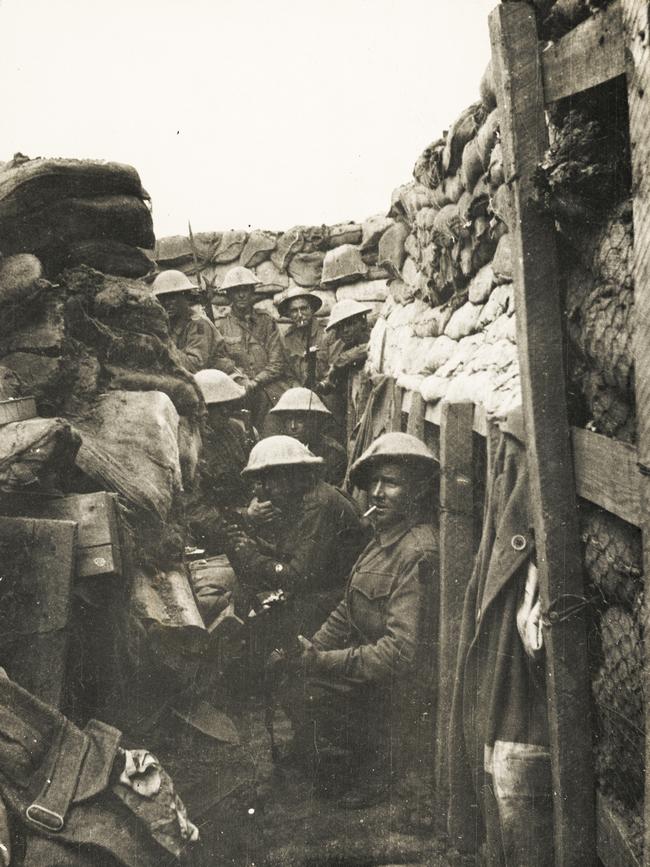
Carrying parties, with sandbags and ammunition, followed after the assaulting waves and soldiers climbed out of their trenches into a storm of fire. Water-filled ditches provided the only protection. Soon the ditches were crammed with wounded and dying men, while others struggled past them carrying boxes of ammunition and supplies.
Engineers laboured to dig communication trenches but wounded men kept falling into them. It was soon obvious to the soldiers that the attack had gone badly wrong but men refused to accept the rumour that they would be ordered to retreat. They clung to their tenuous, water-filled ditches without adequate artillery support and were subjected to determined German counter-attacks throughout the night. In their inexperience, the Australians had cleared the German front-line trenches but failed to man them. The Germans now moved through breaks in the Australian-held second line to reoccupy their empty front line and cut off the Australians’ retreat.
Early on July 20, as daylight approached, the Australians were forced to fall back. Some units began to retire under cover of darkness about 4am, while others pulled back later in daylight with heavy casualties. When the German counter-attacks came against the Australians still holding out, the attacks were launched from both flanks and from the former front line behind the Australians. Many soldiers were cut off and either killed, wounded or captured while trying to escape through the German line to their own lines.
In parts of the line there was some panic; in one case, an NC O of the 31st Battalion brandished a revolver to keep men from breaking in the early morning as they saw many others retiring on both flanks. Elsewhere the withdrawal was more deliberate. Sapper Fred Strode of the 8th Field Company was one of a party of four men instructed to hold their line on the morning of July 20 to enable his company to get back to their trenches. He held on until his supply of hand grenades ran out and his mates were killed, and then he too fled.
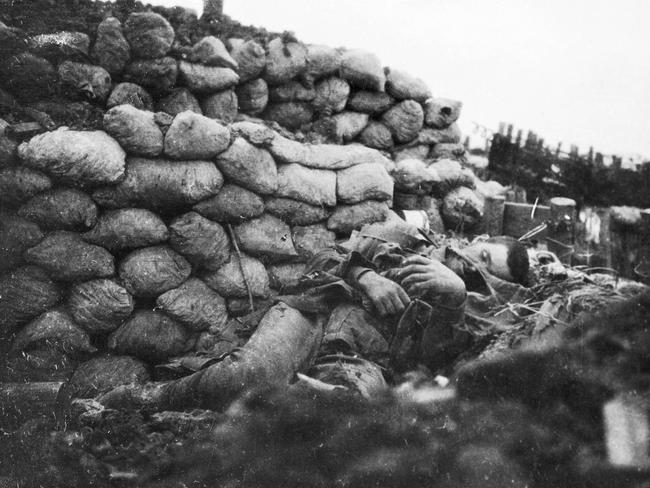
Wounded men had begun to crawl back during the night while others still lay in no-man’s-land, calling for help. By dawn on the morning of July 20 the Australian trenches were packed with wounded and dying men.
For the next three days and nights, Australians risked death or wounds to go out under enemy fire in an attempt to retrieve the hundreds of wounded men in no-man’s-land. But the Germans opened fire at every movement. For several days after the battle a blinded and dazed Australian officer staggered about near the German lines and a number of men were killed attempting to rescue him. Eventually, the Germans shot the man.
An informal truce occurred in one sector, which allowed the Australians to carry in some of their wounded, but when he learned of this, the Australian divisional commander, Major General James Whiteside McCay, called a halt. Some wounded men remained in no-man’s-land for up to a week, scavenging food and water from the dead, hiding by day and crawling by night until at last they reached their own lines.
But many remained missing. More than two years after the battle, on the day of the Armistice of November 11, 1918, when the guns of the Western Front finally ceased fire, Bean wandered over the battlefield of Fromelles and observed the grisly aftermath of the battle: “We found the old No-Man’s-Land simply full of our dead,” he recorded. “The skulls and bones and torn uniforms were lying about everywhere.”
Shortly after the war the remains were gathered to construct VC Corner cemetery. For nearly 80 years this sombre monument remained the only conspicuous reminder of the tragic events of Fromelles until in July 1998 a new Australian Memorial Park was dedicated there. Situated close to VC Corner Cemetery, on a part of the old German front line which was briefly captured and held overnight by the 14th Brigade on July 19-20, the park includes the stark remains of four German blockhouses.
The Australian 5th Division’s losses in this single night amounted to 5533 officers and men killed, wounded or taken prisoner. It would be many months before the division would be ready for action again. The British 61st Division lost 1547 casualties, including 500 dead. The Germans lost fewer than 1600 casualties in the battle, half of them in the regiment opposing the Australians.
In the official history Bean exonerated McCay for his part in the fiasco, but both McCay and his staff share at least some of the blame.
Two battalions of the 15th Brigade suffered heavy casualties when McCay’s staff failed to transmit a crucial message advising that a brigade of the British 61st Division was not attacking, leaving their flank exposed.
On the day after the attack, British headquarters issued an official communiqué: “Yesterday evening, south of Armentieres, we carried out some important raids on a front of two miles in which Australian troops took part. About 140 German prisoners were captured.” It made no mention of Australian or British casualties.
‘I think the attack, although it has failed, has done both divisions a great deal of good.’
~ Lt-Gen Sir Richard Haking ~
The commander of the British XI Corps, Lieutenant General Sir Richard Haking, who had directed the operation, later reported: “The Australian infantry attacked in the most gallant manner and gained the enemy’s position but they were not sufficiently trained to consolidate the ground gained. They were eventually compelled to withdraw and lost heavily in doing so.”
Haking added: “I think the attack, although it failed, has done both divisions a great deal of good.” This was an astonishingly callous judgement from a man who had, in the words of Bean, recklessly thrown away “7000 troops in a single night for so small a result”.
As their initiation at Fromelles showed, Australian soldiers were undoubtedly unprepared for warfare on the Western Front. They had much still to learn and the lessons would be hard and costly.
The major failing at Fromelles, however, lay not with the inexperience of the men but with the piecemeal planning of the attack, which in turn stemmed from the ineptitude of senior commanders.
The attack was planned unimaginatively on rigid, linear waves, assaulting on a narrow front over open ground in broad daylight, identical to the disastrous British attack on the Somme on July 1.
As in the attack on the Somme, the plan had no identified and realistic objectives, and it imposed unrealistic demands on both the men and their available artillery support. The carnage on the Somme had not taught their leaders anything.
The battle of Fromelles was a model of how not to attack on the Western Front. It reflected the lowest ebb of military incompetence in the Great War and signalled how much would need to be learned before the allied armies could achieve victory.
Ashley Ekins is head of the Military History Section at the Australian War Memorial.