Super Rugby AU: Queensland Reds defeat Melbourne Rebels 19-3 and rise to table’s second place
The Queensland Reds have dug into their defensive stores for an extraordinary 19-3 win over the Melbourne Rebels.
Humiliated by the Waratahs last weekend, the Queensland Reds dug deep into their defensive stores to score an extraordinary 19-3 bonus-point win over the Melbourne Rebels at Brisbane’s Suncorp Stadium on Saturday night to move to second place in the Super Rugby AU table.
It’s a rare day when the backroom boys are dragged to the front of the room for plaudits but Reds coach Brad Thorn ensured that the role of former Zimbabwean Michael Todd did not go unrecognised.
A computer analyst for the Reds at the start of the year, Thorn thrust him into the role of defence coach for Queensland after Peter Ryan had to be laid off because of the COVID crisis.
“No one knows who he is but he is going to have a long career and this is just the start of it,” Thorn said after the Reds were forced to make 204 tackles throughout the match to the Rebels’ 66.
“It was Originesque,” Thorn said, drawing on the only example that came to mind for a Queensland team showing such fortitude in defence. “It was like someone (but not Billy Moore) had yelled out ‘Queenslander’. It was like a Test match.”
The Rebels came to Brisbane on a mission to score four wins in succession for the first time in the club’s history and, while it might not be apparent from the numbers of the scoreboard, they threw absolutely everything at their rivals.
But this too was a Reds team with its own eye on history. For almost the entire second half, from the 41st minute to the 74th minute, the Melbourne side was called on to make a total of four tackles. Yes, only four tackles. They absolutely dominated possession and camped inside the Reds’ 22 and just hammered away relentlessly, fuelled by a second-half penalty count of 11-2. But Liam Wright’s Reds refused to buckle.
Three times the Rebels were over the line and three times they were held up. Wallabies No 8 Isi Naisasarni, who had assailed the line time and again, actually looked to have scored in the 66th minute from a driving maul, only for the television replay to disclose that he had dropped the ball.
It was a war of attrition and there were casualties. Rebels playmaker Matt Toomua was set to be taken to hospital after the match for scans on a worrying neck injury. Reds hooker Brandon Paenga-Amosa was yellow-carded in the 70th minute for repeated team infringements, while James O’Connor was forced off with what appeared to be a sternum injury and, just on the stroke of halftime, outside centre Hunter Paisami with a damaged medial ligament.
But even as Thorn emptied the Queensland bench, the maroon line held firm. Halfback Tate McDermott pulled off two stunning try-saving tackles, while inside centre Hamish Stewart marshalled a brilliant backline defensive effort. And appropriately, it was Stewart who eventually broke the siege when he stormed onto a O’Connor pass in the 74th minute – the first ball Queensland had had in the entire second half and broke through the tackles of Campbell Magnay, Reece Hodge and Andrew Deegan to score the try that gave the Reds the unlikeliest of bonus-point victories.
As the competition gathers momentum in the downhill race to the three-team finals, seemingly all sides are in the hunt of a place in the play-off, save for the Western Force who played well against the Waratahs on Friday night but were beaten 28-8.
The Rebels now go into their bye, looking as coach Dave Wessels said, to unleash their best rugby in their remaining two fixture matches against the Waratahs and the Force.
The Reds went into the halftime break 14-3 ahead, having taken full toll of their try-scoring opportunities in the first stanza. It took them a little time to establish their expected scrum dominance but by the 14th minute, they looked to have established their ascendancy, pushing the Rebels pack backwards from an attacking 5m scrum.
It looked, indeed, as though they were about to score a pushover try when suddenly the ball squirted out of the set piece, leaving No 8 Harry Wilson with little option but to gather it in and pass to Tate McDermott on the blindside.
The Reds halfback must have thought this was all too easy but just as he was about to pass to the flank for the routine try, he discovered to his horror that Jordan Petaia had left his wing and gone inside.
Still, McDermott is nothing adaptable and picked out Petaia with an inside pass. He caught it flat-footed but so too was the Rebels defence – and none of them have the reflexes of the Wallabies’ World Cup sensation. By the time they had gathered their wits, Petaia had cut them asunder, waltzing through them for the simplest of tries.
The Reds’ second try also can be credited to the Melbourne defence relaxing, if only for a moment.
Even John Eales Medalist Marika Koriobete had succumbed to the kicking malaise infecting the Melbourne backline, launching a hopeful ‘garryowen’ down the middle of the field that Reds fullback Jock Campbell caught behind the marginally protective wall of halfback McDermott.
Everything from there seemed to happen in in slow motion. Campbell, whose quiet talent it is to seemingly always beat the first tackle, jogged up to the defensive line – and glided straight through it.
He seemed as surprised as anyone but kept his composure and linked with his left-winger Filipo Dalgunu.
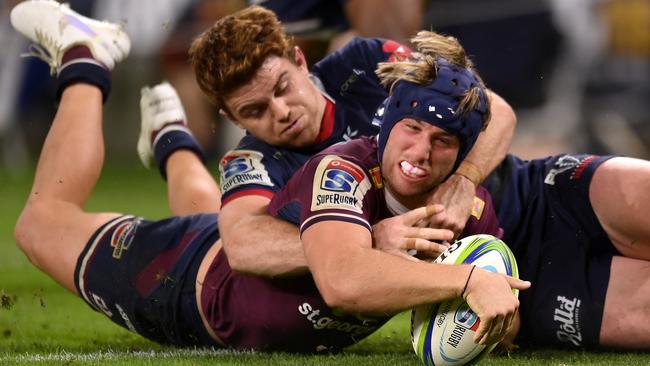
He was cut down by the cover defence but slipped the ball to Paenga-Amosa, who planted it for a stunning try in the tackle of Kellaway.
More Coverage
Waratahs trial standouts, Suaalii injury and a rugby dream for young gun
It’s a time he hated but this painful interlude in Waratahs young gun Henry O’Donnell’s life could well pave the way to his future success in the game. Tahs v Brumbies trial wrap
‘Best No.12 I can’: Rugby goal of son of an NRL gun Zach Fittler
After a code switch that surprised many, teen powerhouse Zach Fittler has spoken about his love of rugby, opening up on the rollercoaster that is playing with a famous rugby league surname.